Bowline Knot: The Grip Is at the Small Eye, Not the Big Loop
Fold, Knot & Bind Published
In brief
A bowline grips at a small eye near the top, not in its big loop. In a crossing map drawn after Verrill's 1917 rope manual, all seven crossings sit in that eye and the collar around the standing part, while the big loop crosses no rope at all.
Materials: One rope and its own end. No second rope, no tools.
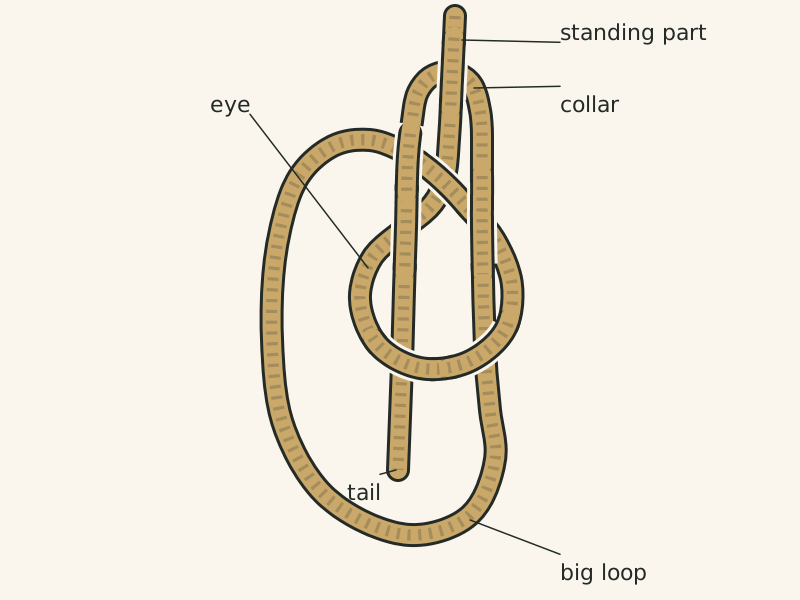
A bowline with the standing part at the top: a small eye in the rope, the end up through it, round behind the standing part and back down through the eye, leaving the big loop below.
Check level Crossings computed from the drawn centerline; written method matched; crossings checked one by one against Verrill (1917), Fig. 59.
"Bowline, drawn from its centerline" by Fold, Knot & Bind — https://foldknotbind.com/knots/bowline/ — licensed under CC BY 4.0: https://creativecommons.org/licenses/by/4.0/
Hold a rope's end in one hand and a small loop in the other. Richard Henry Dana's 1847 seamanship text starts the bowline (No. 22) close to that: the end in the right hand, the standing part (the long main length of the rope) in the left, then a bight of the standing part laid over the end. This page maps the knot's structure only: no source read for it measures a bowline's strength or tests how it slips, so nothing here rates it for any load. For climbing, rescue, lifting or work at height, formal training, in-person instruction and current standards come first.
What holds a bowline: the nip
Trace the big loop with a finger and it crosses no other part of the rope. In this page's drawing, all seven crossings sit higher up, where the small eye wraps the end and the end wraps the standing part. This page calls that cluster the nip: the eye closing on the two passes of the end, plus the collar, the turn of the end behind the standing part.
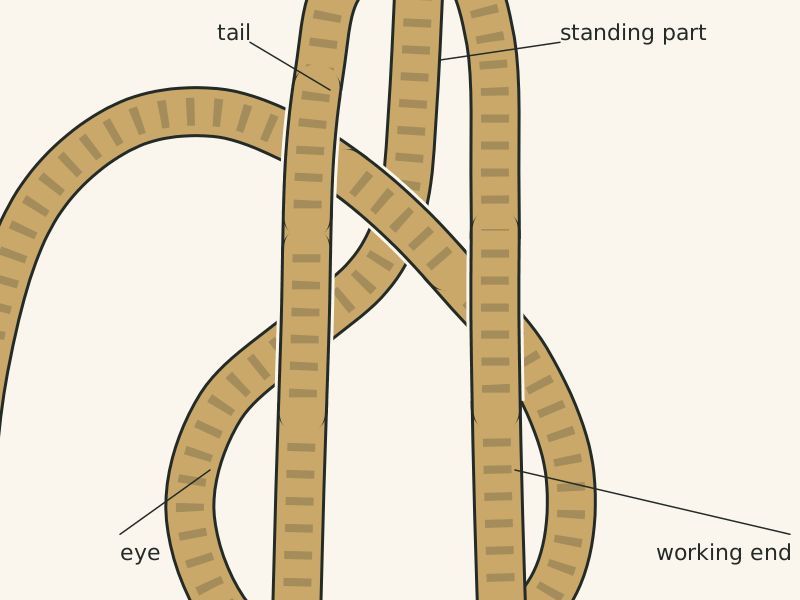
Close-up of the bowline where the small eye crosses over the standing part; the working end on its way up and the tail on its way back down both pass over the eye here.
Check level Crossings computed from the drawn centerline and checked against the written method.
"Bowline close-up at the small eye" by Fold, Knot & Bind — https://foldknotbind.com/knots/bowline/ — licensed under CC BY 4.0: https://creativecommons.org/licenses/by/4.0/
Read through the friction contract, this site's way of reading a knot, each place where rope presses on rope is a clause. A bowline signs all its clauses in the nip, and the big loop signs none. In plain terms, the loop only carries the pull up to the nip, and in this page's drawing every place where rope crosses rope is in the nip.
The nip is also the bowline's third hand, the hidden holder that keeps a part in place after the hands let go. In a sewn book that holder is thread tension, as bookbinding methods shows. In a bowline it is the eye's grip on the end.
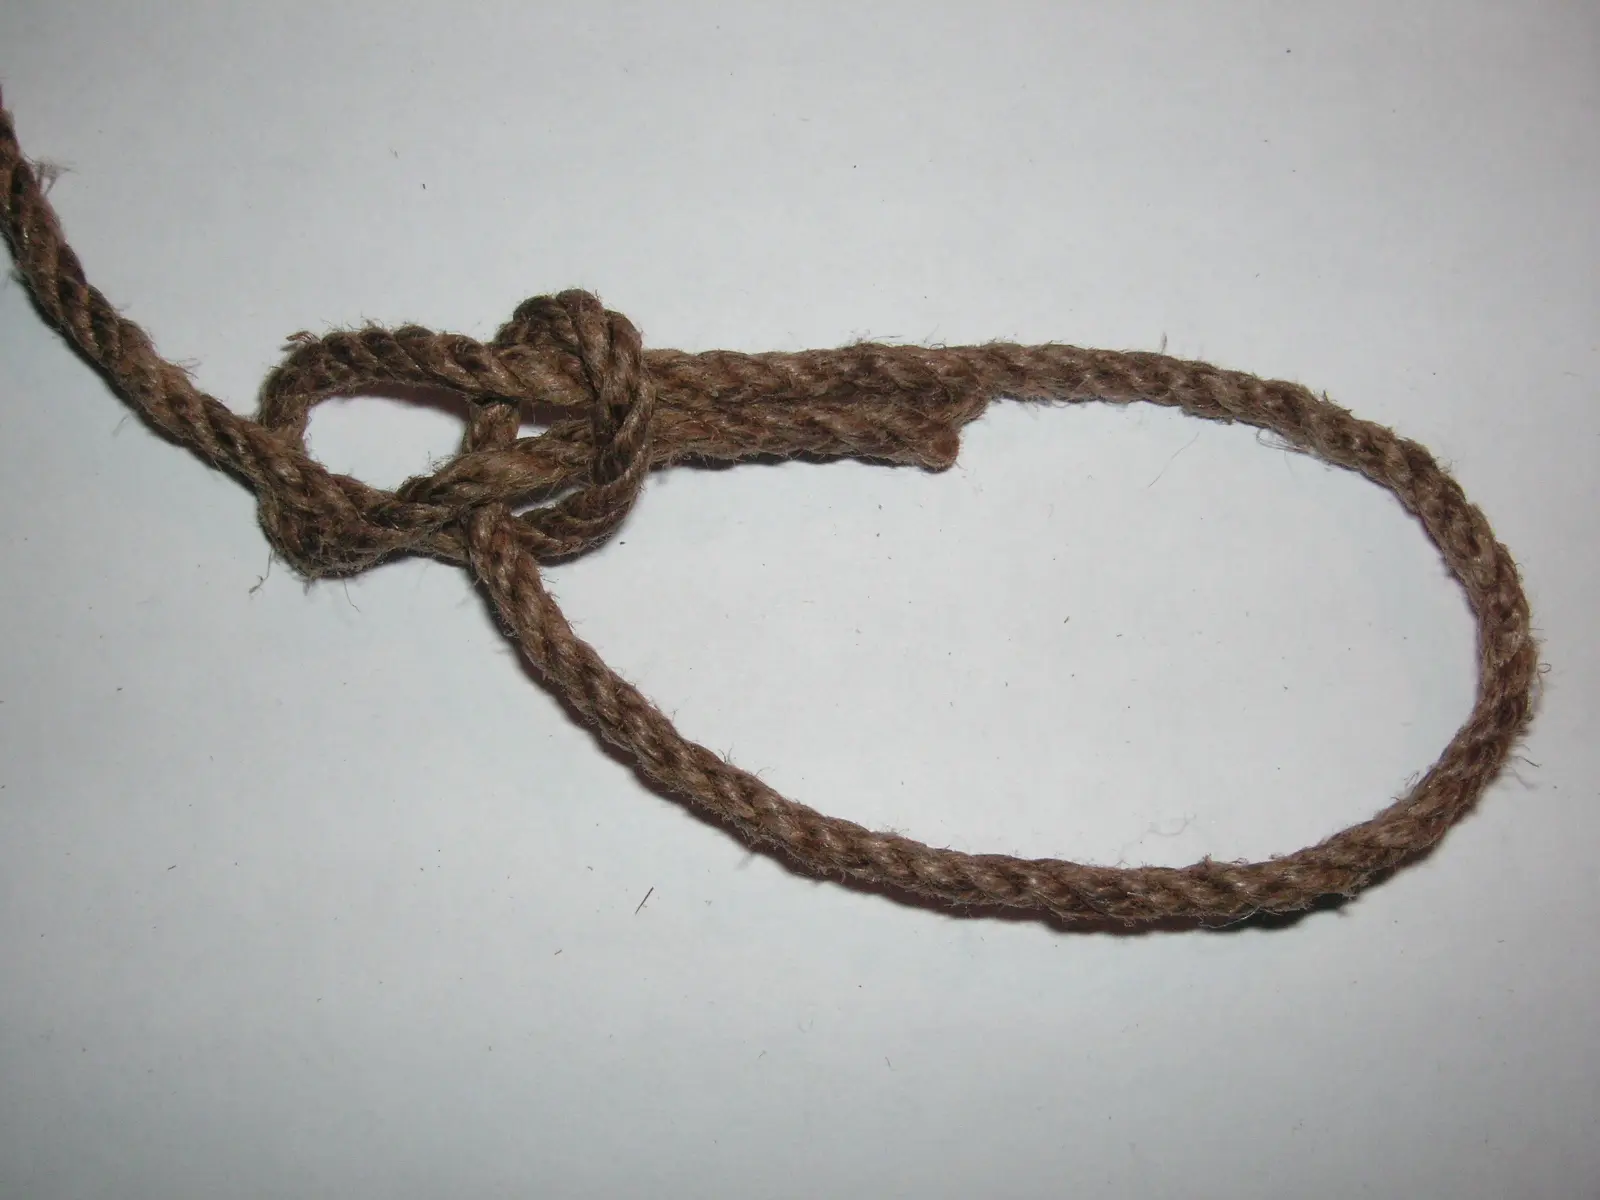
A bowline in three-strand rope. The small eye and the collar sit at one end of the long loop, and the short tail lies inside the loop.
"Palstek (bowline)" (2005), Sebastian Magnusson Wigmo — https://commons.wikimedia.org/wiki/File:Palstek.jpg — Public domain in US and EU (DE/FR): released into the public domain by its author, Sebastian Magnusson Wigmo, worldwide, with a fallback grant to use it for any purpose (author's dedication on the file page)
How a bowline is tied: under, over, under
A. Hyatt Verrill's Knots, Splices and Rope Work (1917) starts from a bight, or small eye, “formed with the end over the standing part.” Then: “Pass A back through the bight, under, then over, then under, as shown in B, then over and down through the bight” (Figs. 58–59; pp. 45–46 in the 1912 printing, which has the same words). In that sentence, A stands for the end.
Against the numbered drawing, those words fit the crossings in order. Coming up, the end goes under the eye at 6 and over it at 5, then behind the standing part at 1; on the way back down it passes over the eye at 2 and 4, and under it at 7. The drawing is a map of crossings, not a tying lesson.
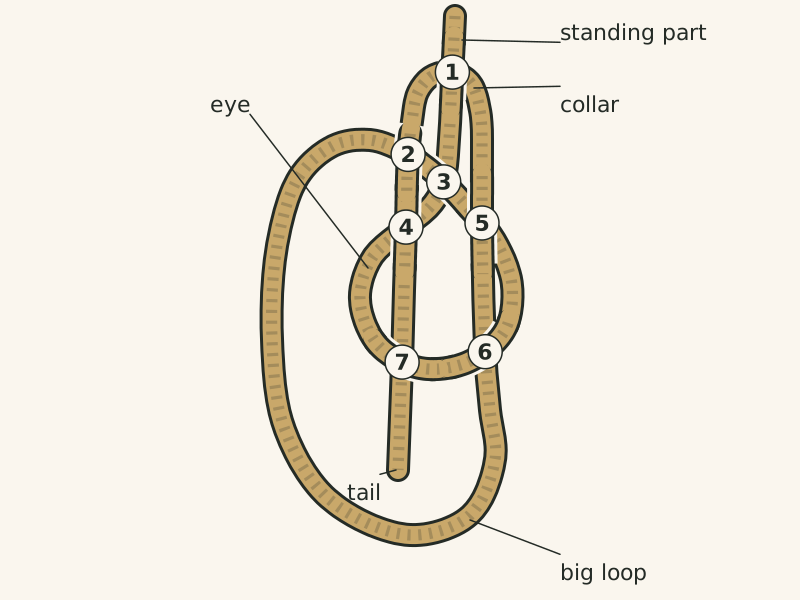
The bowline's seven crossings, numbered. Following the end: under the eye at 6, over it at 5, behind the standing part at 1, then over the eye at 2 and 4 and under it at 7.
Check level Crossings computed from the drawn centerline; written method matched; crossings checked one by one against Verrill (1917), Fig. 59.
"Bowline with its seven crossings numbered" by Fold, Knot & Bind — https://foldknotbind.com/knots/bowline/ — licensed under CC BY 4.0: https://creativecommons.org/licenses/by/4.0/
| Crossing | On top | Underneath |
|---|---|---|
| 1 | Standing part | Collar (the end behind the standing part) |
| 2 | Tail, going back down | Eye |
| 3 | Eye | Standing part |
| 4 | Tail, going back down | Eye |
| 5 | End, coming up | Eye |
| 6 | Eye | End, coming up |
| 7 | Eye | Tail, going back down |
Download the bowline crossings (CSV) (what the file holds)
How the drawings are tested is set out on which layer was checked. For a knot tied over and over instead of once, see macramé.
The bowline in old seamanship manuals
Four public-domain manuals read for this page show the bowline, and the three that describe it in words give the same steps. Darcy Lever's Sheet Anchor (1843 New York edition) lays the end over the standing part, turns a bight of the standing part over it, then has the reader “lead the end round the standing part, through the bight again” (p. 7, Figs. 44–46). Dana's 1847 wording is “up over the cross, and down through the bight” (No. 22).
Lever and Verrill both spell it bow-line. The Bluejackets' Manual of 1917, from the US Navy, lists it fifth among twenty knots and splices to be made “with absolute accuracy” (p. 262), and draws it on the next page.
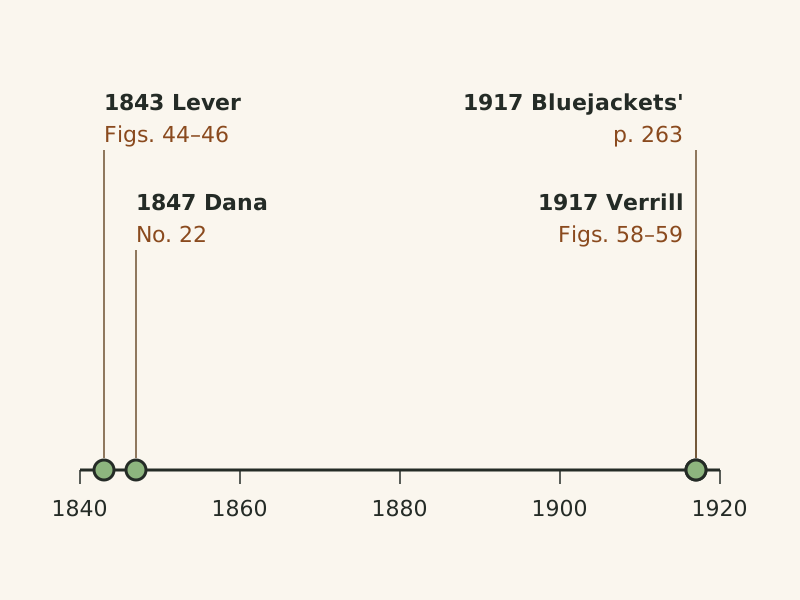
Four manuals that show the bowline, by year: Lever (1843, Figs. 44–46), Dana (1847, No. 22), Verrill (1917, Figs. 58–59) and The Bluejackets' Manual (1917, p. 263).
Check level Each row taken from this page's CSV, which lists the source, year and page for each.
"Manuals that show the bowline, 1843 to 1917" by Fold, Knot & Bind — https://foldknotbind.com/knots/bowline/ — licensed under CC BY 4.0: https://creativecommons.org/licenses/by/4.0/
How it fails: what the manuals do and do not say
The manuals praise the bowline more than they test it. Verrill calls it “a true sailor's knot” that “never slips, jams, or fails” in his 1917 manual (1912 printing, p. 45, same words). The Bluejackets' Manual of 1917 gives “Various uses; it does not slip” (p. 262). Neither names a rope, a load or a test, so this page reports both as each book's words in 1917, not as a safety rating.
No source read for this page describes a bowline with no load on it, or measures its strength, so no failure figure is given here. The crossing map shows where the end runs through the nip; it does not show how the knot moves or fails. Which knot to trust with a load is a matter for formal training and current standards, not for a crossing map.
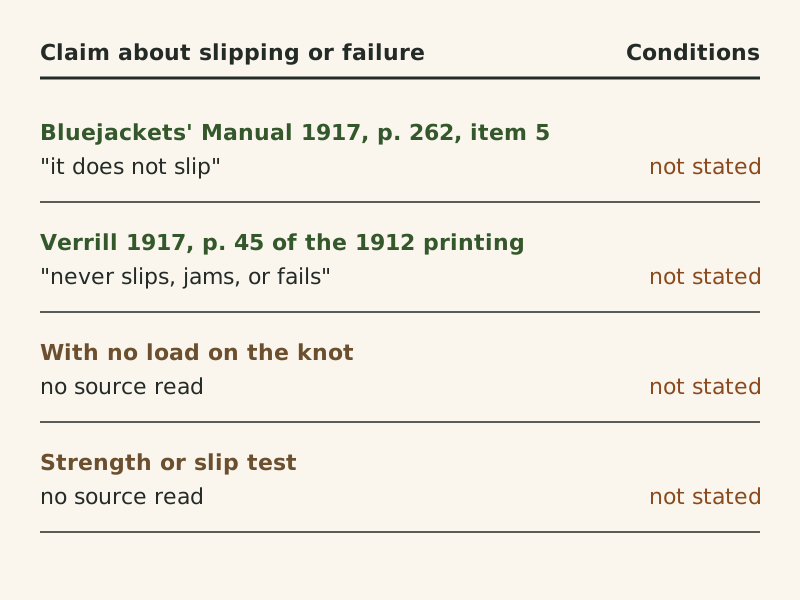
What the sources read for this page say about slipping and failure. Both 1917 claims come without a rope, a load or a test; no source covers the knot with no load or gives test data.
Check level Each row taken from this page's CSV; sources and years in the table.
"Bowline: what the sources say about slipping" by Fold, Knot & Bind — https://foldknotbind.com/knots/bowline/ — licensed under CC BY 4.0: https://creativecommons.org/licenses/by/4.0/
| Claim | Source | Page | Conditions |
|---|---|---|---|
| “never slips, jams, or fails” | Verrill, 1917 | p. 45 (1912 printing) | None given |
| “it does not slip” | Bluejackets' Manual, 1917 | p. 262 | None given |
| No-load behavior | No source read | — | — |
| Strength or slip test | No source read | — | — |
Download the bowline sources and claims (CSV) (what the file holds)
Sources
- A. Hyatt Verrill, Knots, Splices and Rope Work: A Practical Treatise, 2nd rev. ed. (New York: Norman W. Henley, 1917). gutenberg.pglaf.org/cache/epub/13510/Read: full text of the 1917 edition; pages 21-22 and 45-46 checked against the page images of the 1912 printing
- Darcy Lever, The Young Sea Officer's Sheet Anchor; or, A Key to the Leading of Rigging, and to Practical Seamanship (New York: E. & G. W. Blunt, 1843). archive.org/details/youngseaofficers00leveRead: page 7 and the plate facing it (Figs. 40-46 and 51-52), checked against the page images
- Richard Henry Dana Jr., The Seaman's Friend, 5th ed. (Boston: Thomas Groom, 1847). gutenberg.pglaf.org/cache/epub/40958/Read: full text of the knots section (Nos. 17-24) and the dictionary of sea terms entries Clove-hitch and Half-hitch
- The Bluejackets' Manual, United States Navy, 5th ed. (1917). archive.org/details/bluejacketsmanua0000lie…Read: pages 262 and 263, checked against the page images
Cite this page
“Bowline Knot: The Grip Is at the Small Eye, Not the Big Loop.” Fold, Knot & Bind. Published Nov. 15, 2026. https://foldknotbind.com/knots/bowline/. Accessed on the date you read it.
How diagrams and claims are checked All corrections Report an error on this page (contact@foldknotbind.com)
Next on the bench:
- Square knot vs granny knot: Another knot held where two bights bite into each other.
- Clove hitch vs two half hitches: The same kind of turns; Dana's 1847 text and Lever's 1843 manual disagree on which one is the clove hitch.
More in Knots
Knots
Square Knot vs Granny Knot: One Throw Reversed
Picture credit
"Gold armband with Herakles knot, Greek, 3rd–2nd century B.C. (Metropolitan Museum of Art 1999.209)" by Unknown author — https://commons.wikimedia.org/wiki/File:Gold_armband_with_Herakles_knot_MET_DT4404.jpg — CC0 1.0 (https://creativecommons.org/publicdomain/zero/1.0/)
Knots
Celtic Knot Patterns: Some Are One Cord, Some Are Several
Picture credit
"Carpet page, from the Lindisfarne Gospels" (late 7th or early 8th century), Unknown author — https://commons.wikimedia.org/wiki/File:Meister_des_Book_of_Lindisfarne_002.jpg — Public domain in US: medieval manuscript page, public domain; faithful photographic reproduction of a two-dimensional work (PD-Art). EU: maker died more than 1,000 years ago; faithful reproduction of a public-domain visual work (EU Directive 2019/790, Art. 14)
Knots
Macramé: An 1890 Manual Says Repeated Half Knots Twist
Picture credit
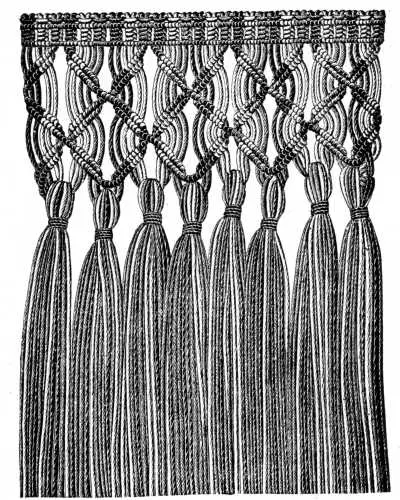
"Macramé fringe (fig. 548), from Encyclopedia of Needlework" (undated English edition (before 1931)), Thérèse de Dillmont, Encyclopedia of Needlework — https://gutenberg.pglaf.org/cache/epub/20776/images/563.jpg — Public domain in US: published before 1931 (undated English edition of the Encyclopedia of Needlework; title page 'To be had of Th. de Dillmont, Dornach, Alsace'); EU (DE/FR): author Thérèse de Dillmont d. 1890; engraver not named in the book (anonymous, published more than 70 years ago)